Create backend services for native mobile apps with ASP.NET Core
Mobile apps can communicate with ASP.NET Core backend services. For instructions on connecting local web services from iOS simulators and Android emulators, see Connect to Local Web Services from iOS Simulators and Android Emulators.
View or download sample backend services code
The Sample Native Mobile App
This tutorial demonstrates how to create backend services using ASP.NET Core to support native mobile apps. It uses the Xamarin.Forms TodoRest app as its native client, which includes separate native clients for Android, iOS, and Windows. You can follow the linked tutorial to create the native app (and install the necessary free Xamarin tools), and download the Xamarin sample solution. The Xamarin sample includes an ASP.NET Core Web API services project, which this article's ASP.NET Core app replaces (with no changes required by the client).
Features
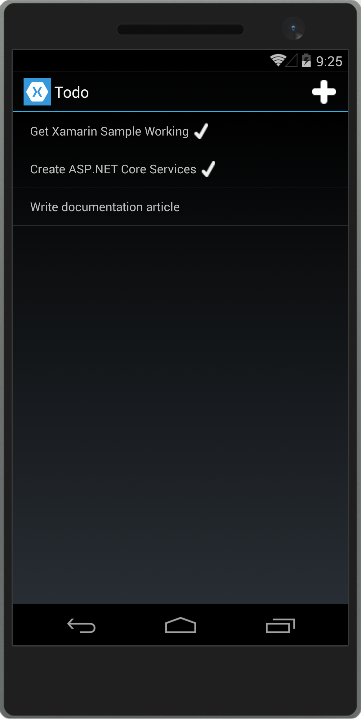
The TodoREST app supports listing, adding, deleting, and updating To-Do items. Each item has an ID, a Name, Notes, and a property indicating whether it's been Done yet.
In the previous example, The main view of the items lists each item's name and indicates if it's done with a checkmark.
Tapping the + icon opens an add item dialog:

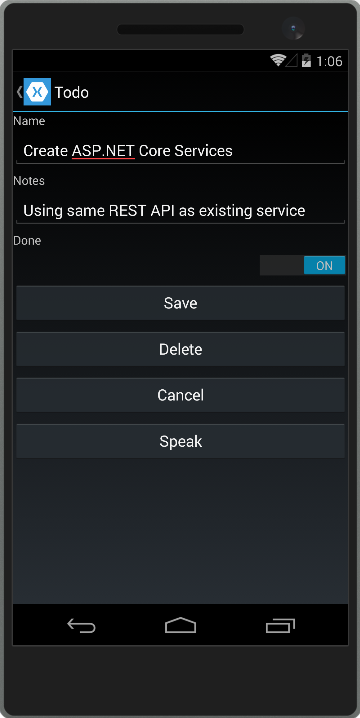
Tapping an item on the main list screen opens up an edit dialog where the item's Name, Notes, and Done settings can be modified, or the item can be deleted:
To test it out yourself against the ASP.NET Core app created in the next section running on your computer, update the app's RestUrl constant.
Android emulators don't run on the local machine and use a loopback IP (10.0.2.2) to communicate with the local machine. Use Xamarin.Essentials DeviceInfo to detect what operating the system is running to use the correct URL.
Navigate to the TodoREST project and open the Constants.cs file. The Constants.cs file contains the following configuration.
using Xamarin.Essentials;
using Xamarin.Forms;

namespace TodoREST
{
    public static class Constants
    {
        // URL of REST service
        //public static string RestUrl = "https://YOURPROJECT.azurewebsites.net:8081/api/todoitems/{0}";

        // URL of REST service (Android does not use localhost)
        // Use http cleartext for local deployment. Change to https for production
        public static string RestUrl = DeviceInfo.Platform == DevicePlatform.Android ? "http://10.0.2.2:5000/api/todoitems/{0}" : "http://localhost:5000/api/todoitems/{0}";
    }
}
You can optionally deploy the web service to a cloud service such as Azure and update the RestUrl.
Creating the ASP.NET Core Project
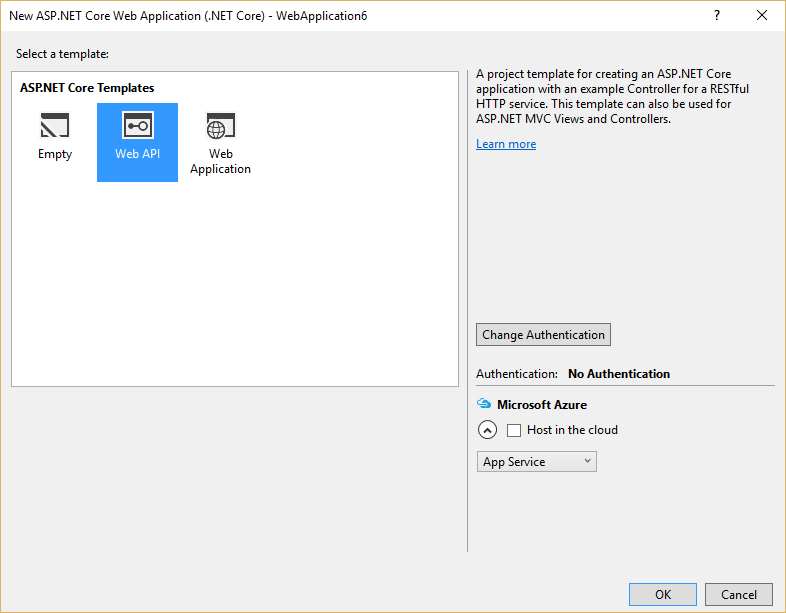
Create a new ASP.NET Core Web Application in Visual Studio. Choose the Web API template. Name the project TodoAPI.
The app should respond to all requests made to port 5000 including clear-text HTTP traffic for our mobile client. Update Startup.cs so UseHttpsRedirection doesn't run in development:
public void Configure(IApplicationBuilder app, IWebHostEnvironment env)
{
    if (env.IsDevelopment())
    {
        app.UseDeveloperExceptionPage();
    }
    else
    {
        // For mobile apps, allow http traffic.
        app.UseHttpsRedirection();
    }

    app.UseRouting();

    app.UseAuthorization();

    app.UseEndpoints(endpoints =>
    {
        endpoints.MapControllers();
    });
}
Note
Run the app directly, rather than behind IIS Express. IIS Express ignores non-local requests by default. Run dotnet run from a command prompt, or choose the app name profile from the Debug Target dropdown in the Visual Studio toolbar.
Add a model class to represent To-Do items. Mark required fields with the [Required] attribute:
using System.ComponentModel.DataAnnotations;

namespace TodoAPI.Models
{
    public class TodoItem
    {
        [Required]
        public string ID { get; set; }

        [Required]
        public string Name { get; set; }

        [Required]
        public string Notes { get; set; }

        public bool Done { get; set; }
    }
}
The API methods require some way to work with data. Use the same ITodoRepository interface the original Xamarin sample uses:
using System.Collections.Generic;
using TodoAPI.Models;

namespace TodoAPI.Interfaces
{
    public interface ITodoRepository
    {
        bool DoesItemExist(string id);
        IEnumerable<TodoItem> All { get; }
        TodoItem Find(string id);
        void Insert(TodoItem item);
        void Update(TodoItem item);
        void Delete(string id);
    }
}
For this sample, the implementation just uses a private collection of items:
using System.Collections.Generic;
using System.Linq;
using TodoAPI.Interfaces;
using TodoAPI.Models;

namespace TodoAPI.Services
{
    public class TodoRepository : ITodoRepository
    {
        private List<TodoItem> _todoList;

        public TodoRepository()
        {
            InitializeData();
        }

        public IEnumerable<TodoItem> All
        {
            get { return _todoList; }
        }

        public bool DoesItemExist(string id)
        {
            return _todoList.Any(item => item.ID == id);
        }

        public TodoItem Find(string id)
        {
            return _todoList.FirstOrDefault(item => item.ID == id);
        }

        public void Insert(TodoItem item)
        {
            _todoList.Add(item);
        }

        public void Update(TodoItem item)
        {
            var todoItem = this.Find(item.ID);
            var index = _todoList.IndexOf(todoItem);
            _todoList.RemoveAt(index);
            _todoList.Insert(index, item);
        }

        public void Delete(string id)
        {
            _todoList.Remove(this.Find(id));
        }

        private void InitializeData()
        {
            _todoList = new List<TodoItem>();

            var todoItem1 = new TodoItem
            {
                ID = "6bb8a868-dba1-4f1a-93b7-24ebce87e243",
                Name = "Learn app development",
                Notes = "Take Microsoft Learn Courses",
                Done = true
            };

            var todoItem2 = new TodoItem
            {
                ID = "b94afb54-a1cb-4313-8af3-b7511551b33b",
                Name = "Develop apps",
                Notes = "Use Visual Studio and Visual Studio for Mac",
                Done = false
            };

            var todoItem3 = new TodoItem
            {
                ID = "ecfa6f80-3671-4911-aabe-63cc442c1ecf",
                Name = "Publish apps",
                Notes = "All app stores",
                Done = false,
            };

            _todoList.Add(todoItem1);
            _todoList.Add(todoItem2);
            _todoList.Add(todoItem3);
        }
    }
}
Configure the implementation in Startup.cs:
public void ConfigureServices(IServiceCollection services)
{
    services.AddSingleton<ITodoRepository, TodoRepository>();
    services.AddControllers();
}
Creating the Controller
Add a new controller to the project, TodoItemsController. It should inherit from ControllerBase. Add a Route attribute to indicate that the controller handles requests made to paths starting with api/todoitems. The [controller] token in the route is replaced by the name of the controller (omitting the Controller suffix), and is especially helpful for global routes. Learn more about routing.
The controller requires an ITodoRepository to function; request an instance of this type through the controller's constructor. At runtime, this instance is provided using the framework's support for dependency injection.
[ApiController]
[Route("api/[controller]")]
public class TodoItemsController : ControllerBase
{
    private readonly ITodoRepository _todoRepository;

    public TodoItemsController(ITodoRepository todoRepository)
    {
        _todoRepository = todoRepository;
    }
This API supports four different HTTP verbs to perform CRUD (Create, Read, Update, Delete) operations on the data source. The simplest of these is the Read operation, which corresponds to an HTTP GET request.
Test the API using curl
You can test the API method using a variety of tools. For this tutorial the following open source command-line tools are used:
- curl: Transfers data using various protocols including HTTP and HTTPS. curl is used in this tutorial to call the API using HTTP methods
GET,POST,PUT, andDELETE. - jq: A JSON processor used in this tutorial to format JSON data so that it's easy to read from the API response.
Install curl and jq
curl is preinstalled on macOS and is used directly within the macOS Terminal application. For more information on installing curl, see the Official curl website.
jq can be installed from Homebrew from the terminal:
Install Homebrew, if not already installed, with the following command:
/bin/bash -c "$(curl -fsSL https://raw.githubusercontent.com/Homebrew/install/HEAD/install.sh)"
Follow the instructions presented by the installer.
Install jq using Homebrew with the following command:
brew install jq
For more information on Homebrew and jq installation, see Homebrew and jq.
Reading Items
Requesting a list of items is done with a GET request to the List method. The [HttpGet] attribute on the List method indicates that this action should only handle GET requests. The route for this action is the route specified on the controller. You don't necessarily need to use the action name as part of the route. You just need to ensure each action has a unique and unambiguous route. Routing attributes can be applied at both the controller and method levels to build up specific routes.
[HttpGet]
public IActionResult List()
{
    return Ok(_todoRepository.All);
}
In the terminal, call the following curl command:
curl -v -X GET 'http://localhost:5000/api/todoitems/' | jq
The previous curl command includes the following components:
-v: Activates verbose mode, providing detailed information about the HTTP response and is useful for API testing and troubleshooting.-X GET: Specifies the use of the HTTPGETmethod for the request. While curl can often infer the intended HTTP method, this option makes it explicit.'http://localhost:5000/api/todoitems/': This is the request’s target URL. In this instance, it’s a REST API endpoint.| jq: This segment isn’t related to curl directly. The pipe|is a shell operator that takes the output from the command on its left and “pipes” it to the command on its right.jqis a command-line JSON processor. While not required,jqmakes the returned JSON data easier to read.
The List method returns a 200 OK response code and all of the Todo items, serialized as JSON:
[
  {
    "id": "6bb8a868-dba1-4f1a-93b7-24ebce87e243",
    "name": "Learn app development",
    "notes": "Take Microsoft Learn Courses",
    "done": true
  },
  {
    "id": "b94afb54-a1cb-4313-8af3-b7511551b33b",
    "name": "Develop apps",
    "notes": "Use Visual Studio and Visual Studio for Mac",
    "done": false
  },
  {
    "id": "ecfa6f80-3671-4911-aabe-63cc442c1ecf",
    "name": "Publish apps",
    "notes": "All app stores",
    "done": false
  }
]
Creating Items
By convention, creating new data items is mapped to the HTTP POST verb. The Create method has an [HttpPost] attribute applied to it and accepts a TodoItem instance. Since the item argument is passed in the body of the POST, this parameter specifies the [FromBody] attribute.
Inside the method, the item is checked for validity and prior existence in the data store, and if no issues occur, it's added using the repository. Checking ModelState.IsValid performs model validation, and should be done in every API method that accepts user input.
[HttpPost]
public IActionResult Create([FromBody]TodoItem item)
{
    try
    {
        if (item == null || !ModelState.IsValid)
        {
            return BadRequest(ErrorCode.TodoItemNameAndNotesRequired.ToString());
        }
        bool itemExists = _todoRepository.DoesItemExist(item.ID);
        if (itemExists)
        {
            return StatusCode(StatusCodes.Status409Conflict, ErrorCode.TodoItemIDInUse.ToString());
        }
        _todoRepository.Insert(item);
    }
    catch (Exception)
    {
        return BadRequest(ErrorCode.CouldNotCreateItem.ToString());
    }
    return Ok(item);
}
The sample uses an enum containing error codes that are passed to the mobile client:
public enum ErrorCode
{
    TodoItemNameAndNotesRequired,
    TodoItemIDInUse,
    RecordNotFound,
    CouldNotCreateItem,
    CouldNotUpdateItem,
    CouldNotDeleteItem
}
In the terminal, test adding new items by calling the following curl command using the POST verb and providing the new object in JSON format in the Body of the request.
curl -v -X POST 'http://localhost:5000/api/todoitems/' \
--header 'Content-Type: application/json' \
--data '{
  "id": "6bb8b868-dba1-4f1a-93b7-24ebce87e243",
  "name": "A Test Item",
  "notes": "asdf",
  "done": false
}' | jq
The previous curl command includes the following options:
--header 'Content-Type: application/json': Sets theContent-Typeheader toapplication/json, indicating that the request body contains JSON data.--data '{...}': Sends the specified data in the request body.
The method returns the newly created item in the response.
Updating Items
Modifying records is done using HTTP PUT requests. Other than this change, the Edit method is almost identical to Create. If the record isn't found, the Edit action returns a NotFound (404) response.
[HttpPut]
public IActionResult Edit([FromBody] TodoItem item)
{
    try
    {
        if (item == null || !ModelState.IsValid)
        {
            return BadRequest(ErrorCode.TodoItemNameAndNotesRequired.ToString());
        }
        var existingItem = _todoRepository.Find(item.ID);
        if (existingItem == null)
        {
            return NotFound(ErrorCode.RecordNotFound.ToString());
        }
        _todoRepository.Update(item);
    }
    catch (Exception)
    {
        return BadRequest(ErrorCode.CouldNotUpdateItem.ToString());
    }
    return NoContent();
}
To test with curl, change the verb to PUT. Specify the updated object data in the Body of the request.
curl -v -X PUT 'http://localhost:5000/api/todoitems/' \
--header 'Content-Type: application/json' \
--data '{
  "id": "6bb8b868-dba1-4f1a-93b7-24ebce87e243",
  "name": "A Test Item",
  "notes": "asdf",
  "done": true
}' | jq
This method returns a NoContent (204) response when successful, for consistency with the pre-existing API.
Deleting Items
Deleting records is accomplished by making DELETE requests to the service, and passing the ID of the item to be deleted. As with updates, requests for items that don't exist receive NotFound responses. Otherwise, a successful request returns a NoContent (204) response.
[HttpDelete("{id}")]
public IActionResult Delete(string id)
{
    try
    {
        var item = _todoRepository.Find(id);
        if (item == null)
        {
            return NotFound(ErrorCode.RecordNotFound.ToString());
        }
        _todoRepository.Delete(id);
    }
    catch (Exception)
    {
        return BadRequest(ErrorCode.CouldNotDeleteItem.ToString());
    }
    return NoContent();
}
Test with curl by changing the HTTP verb to DELETE and appending the ID of the data object to delete at the end of the URL. Nothing is required in the Body of the request.
curl -v -X DELETE 'http://localhost:5000/api/todoitems/6bb8b868-dba1-4f1a-93b7-24ebce87e243'
Prevent over-posting
Currently the sample app exposes the entire TodoItem object. Production apps typically limit the data that's input and returned using a subset of the model. There are multiple reasons behind this and security is a major one. The subset of a model is usually referred to as a Data Transfer Object (DTO), input model, or view model. DTO is used in this article.
A DTO may be used to:
- Prevent over-posting.
- Hide properties that clients aren't supposed to view.
- Omit some properties to reduce payload size.
- Flatten object graphs that contain nested objects. Flattened object graphs can be more convenient for clients.
To demonstrate the DTO approach, see Prevent over-posting
Common Web API Conventions
As you develop the backend services for your app, you'll want to come up with a consistent set of conventions or policies for handling cross-cutting concerns. For example, in the service shown previously, requests for specific records that weren't found received a NotFound response, rather than a BadRequest response. Similarly, commands made to this service that passed in model bound types always checked ModelState.IsValid and returned a BadRequest for invalid model types.
Once you've identified a common policy for your APIs, you can usually encapsulate it in a filter. Learn more about how to encapsulate common API policies in ASP.NET Core MVC applications.
Additional resources
ASP.NET Core
Feedback
Coming soon: Throughout 2024 we will be phasing out GitHub Issues as the feedback mechanism for content and replacing it with a new feedback system. For more information see: https://aka.ms/ContentUserFeedback.
Submit and view feedback for